American Sycamore Seed: How to Plant and Grow
- By Henry More
- August 25, 2025
I’ve always been fascinated by the sheer size of the American Sycamore, and I recently decided I wanted to try growing one from seed. It seems like a straightforward process, but there are a few things to keep in mind. From collecting the seed balls to giving the tiny seedlings the right start, I’m putting together this guide based on what I’ve learned to help anyone else who wants to grow these magnificent trees.
Key Takeaways
- American sycamore seeds are found in fuzzy, spherical seed balls, often called buttonballs.
- Harvesting the seed balls is best done in late fall or early spring before they break apart.
- While American sycamore seeds don’t strictly require stratification, cold, dry storage helps maintain viability for several years.
- Planting involves sowing seeds shallowly (about 1/8 inch deep) in moist soil, ideally in spring.
- Young seedlings need consistent moisture, indirect light, and protection from pests and harsh conditions as they establish.
American Sycamore Seed Basics
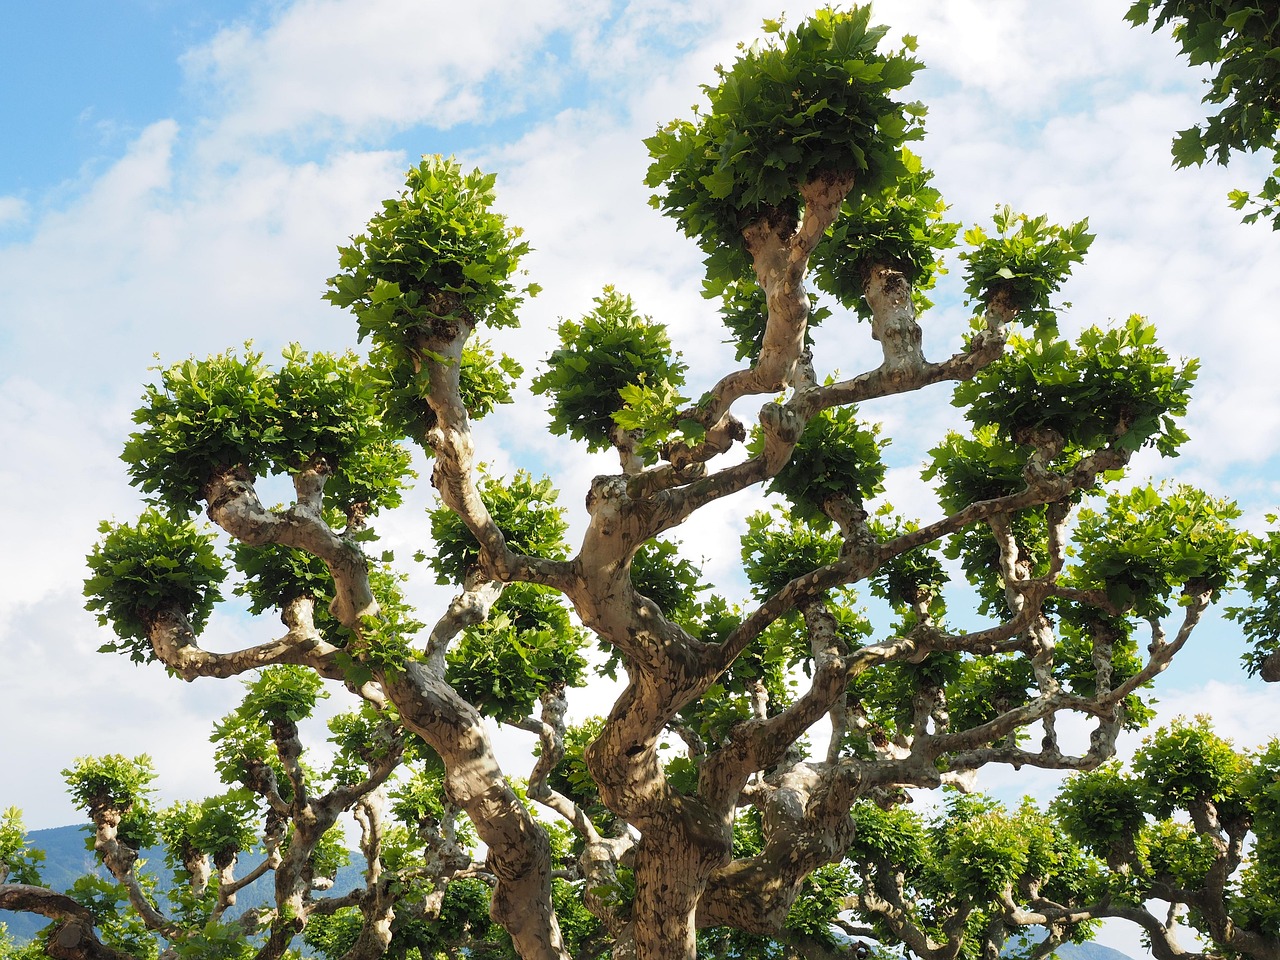
When I first thought about growing an American Sycamore from seed, I wasn’t sure where to start. These trees are impressive, and learning about them felt like a good first step. The American Sycamore, or Platanus occidentalis, is the biggest deciduous tree you’ll find in North America. Seriously, these things can get huge, often reaching heights of 75 to 100 feet. They’re native to North America, which is cool.
One of the most distinctive things about them is their bark. It’s this cool peeling bark that shows off lighter colors underneath. It gives them a sort of mottled look, especially as they get older. The leaves are also quite large, between 5 to 10 inches across, and they have a shape that kind of resembles maple leaves, which is why they’re sometimes called planetrees. The seed pods, often called ‘buttonballs’ because they’re round and fuzzy, are another easy way to spot them. They’re about 1.5 inches wide.
Here’s a quick rundown of what I learned about their basic characteristics:
- Botanical Name:Platanus occidentalis
- Common Names: Sycamore, American sycamore, buttonball tree, buttonwood, western planetree, American planetree
- Family: Platanaceae
- Hardiness Zones: USDA Zones 4-9
- Sun Exposure: Prefers partial to full sun.
- Soil Type: Likes moist, well-drained soil, but can handle a range of conditions.
- Native Area: Eastern and Central North America.
I found out that sycamores have extensive, shallow root systems. While this helps them get water, it also means they can sometimes cause issues with pavement or underground pipes if planted too close. It’s something to keep in mind when picking a spot for your tree.
The American Sycamore is known for its rapid growth and tolerance to various conditions, including wet soil, wind, and even some drought. It’s a hardy tree that can adapt to a lot of different environments, making it a good choice for many landscapes.
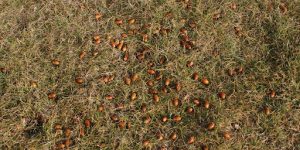
Harvesting Seed Balls
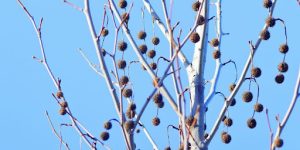
Collecting the seed balls, or ‘fruit heads’ as they’re sometimes called, from an American sycamore tree is a straightforward process, but timing is key. These trees typically flower in the spring, and their seeds mature throughout the summer, getting ready for collection in the fall. I aim to gather them from September through November. The best time to pick the seed heads is just before they start to break apart on their own and release those fuzzy seeds. It’s much easier to collect them when they’re still intact on the branches. Waiting until after the leaves have fallen also helps, as it makes spotting the brown seed heads simpler.
You can often find intact heads on the ground later in the season, especially in colder climates, but picking them directly from the tree is generally more reliable.
Once you have your seed heads, the next step is to dry them out. I spread them in a single layer on trays in a well-ventilated area. This helps them dry properly, even if they seem dry when you collect them. Some seeds collected early can still hold a good amount of moisture, so this drying step is important for their viability.
After they’re dry, you’ll need to extract the seeds. I do this by gently crushing the dried fruit balls. You might need to rub them through some hardware cloth to separate the seeds from the chaff and the fine hairs. If you’re doing a large batch, it’s a good idea to wear a dust mask, as those fine hairs can be a bit irritating to the lungs.
Seed Storage Tips for American Sycamore
After you’ve collected your American sycamore seed pods, proper storage is key to keeping those seeds viable for planting. I’ve found that keeping them cool and dry works best. Think of it like putting them in a little winter nap. The goal is to maintain a low moisture content in the seeds. If you’re storing them for a while, I’d aim for a moisture level between 5% and 10%. I put the dried seeds into airtight containers, like sealed plastic bags, to prevent them from absorbing moisture from the air. Then, I tuck these away in a cool spot, ideally between 32°F and 45°F. I’ve heard they can stay good for up to five years this way, which is neat if you plan on planting a few trees over time.
Here’s a quick rundown of what I do:
- Dry the Seed Heads: After collecting, spread the seed heads out in a single layer on trays. Make sure they have good air circulation until they’re dry enough to break apart easily.
- Extract the Seeds: Gently crush the dried seed balls. You might need to rub them through some hardware cloth to separate the seeds from the fuzzy bits and dust. Wear a mask if you’re doing a lot; that fuzz can be irritating.
- Store in Airtight Containers: Place the cleaned, dry seeds into sealed bags or containers.
- Refrigerate: Store the containers in a cool place, like your refrigerator, keeping the temperature steady.
It’s important to remember that sycamore seeds don’t typically have strict dormancy requirements, unlike some other tree seeds. This means they are ready to go without much fuss when you decide to plant them, as long as they’ve been stored correctly.
Pre-Planting Treatment
When I first started looking into growing American Sycamores from seed, I wondered if there was some special trick to getting them going. It turns out, for the most part, American sycamore seeds are straightforward. Unlike some tree seeds that need a whole song and dance to wake them up, sycamore seeds don’t have any major dormancy issues. This means you generally don’t need to do any fancy pre-planting treatments to get them to sprout.
However, there’s a little nuance to consider. While stratification isn’t strictly required for American sycamore, some sources suggest that a period of cold, moist storage can boost germination rates. If you’re aiming for the highest possible success, you might consider giving them a little help.
Here’s a general idea of what that might look like:
- Collect seeds: Gather the seed balls in the fall or winter.
- Dry and extract: Let the seed balls dry out, then gently break them apart to get the seeds. Remove any fuzzy bits.
- Moist stratification (optional): Mix the seeds with a bit of moist sand or peat moss in a plastic bag. Keep this in the refrigerator for about 60 to 90 days. This mimics the natural winter conditions seeds experience.
It’s important to remember that while this extra step can be beneficial, it’s not a deal-breaker for American sycamore seeds. Many people have success just planting them directly without any special treatment.
So, while you don’t have to stratify them, it’s an option if you want to give your seeds the best possible start. For most home gardeners, simply planting the seeds as they are, especially in the spring, will likely yield good results. You can find more information on collecting and preparing seeds on the pages about sycamore seed collection.
Best Time to Sow Sycamore Seeds
When it comes to planting American sycamore seeds, timing can make a difference. While nature often handles the process by letting seeds fall in the spring, I’ve found that mimicking these natural conditions works best for me. This means sowing the seeds when the weather starts to warm up after the last frost.
Spring planting is generally the preferred method for American sycamore seeds. This allows the young seedlings to take advantage of the longer growing season ahead, giving them a good start before the cooler weather arrives. It also aligns with when the trees naturally shed their seeds and when germination typically occurs in the wild.
However, some sources suggest that collecting the seed balls in the fall and letting nature stratify them over winter before planting in the spring is also a viable approach. If you collect the seed balls in the fall, you can store them in a cool, dry place and then sow them outdoors in early spring. This method relies on the natural cold period to break any dormancy the seeds might have, though American sycamores aren’t typically known for strong dormancy requirements.
Here’s a quick look at the timing considerations:
- Spring Sowing: Sow seeds after the last frost has passed. This gives them the longest growing season.
- Fall Collection, Spring Sowing: Collect seed balls in fall, store them, and sow in early spring.
- Fall Sowing (Less Common): While less common for American sycamores, some seeds can be sown in late fall. This relies entirely on natural stratification and can be riskier due to unpredictable winter conditions.
Ultimately, my experience points to spring as the most reliable time to sow these seeds. It simplifies the process by aligning with the natural cycle and providing the best conditions for germination and early growth.
How to Plant Sycamore Seeds
When I decided to try growing American Sycamore from seed, I wasn’t sure where to start with the actual planting. It turns out, it’s not too complicated if you get the details right. First off, you’ll want to prepare a seed-starting mix. A good, light potting soil that drains well is ideal. I mix in a bit of perlite to make sure it’s not too dense. You can start your seeds in shallow trays or small pots. Just fill them with your prepared soil mix, leaving a little space at the top.
Now, for the planting itself. You don’t need to bury the sycamore seeds very deep at all. A depth of about 1/8 inch is plenty. I find it easiest to just sprinkle the seeds onto the soil surface and then gently press them down. If you’re using trays, try to space the seeds about six to eight inches apart. This gives them a little room to grow before you have to think about transplanting. If you’re planting in pots, one or two seeds per pot is enough.
After planting, give them a gentle watering. You want the soil to be moist, but not waterlogged. Keeping the soil consistently damp is key to germination. I cover my trays or pots with a clear plastic lid or bag to help keep the moisture in, creating a mini-greenhouse effect. This seems to help the seeds get started.
It’s important to remember that sycamore seeds are quite small and delicate. Handling them with care during the planting process will give them the best chance to sprout and grow into healthy young trees. Think of it as giving them a good start in life.
If you’re planting a lot of seeds, you might want to consider a larger container or a dedicated seed-starting bed. Just make sure the spacing is adequate. For example, if you’re using a tray that’s 10 inches by 20 inches, you could comfortably plant around 30-40 seeds with that six-to-eight-inch spacing in mind. This ensures they aren’t competing too much for resources right from the start. It’s a good idea to check out resources on native tree planting for more general tips on soil preparation and spacing.
Watering and Moisture Management for Seed Germination
Once you’ve planted your sycamore seeds, keeping the soil consistently moist is key to successful germination. Think of it like a damp sponge – not soaking wet, but definitely not dry. I check the soil surface daily. If it feels dry to the touch, it’s time to water.
- Gentle watering is best. I use a watering can with a fine rose or a spray bottle to avoid disturbing the seeds or washing them away.
- Water from the bottom if possible. Placing seed trays in a shallow dish of water allows the soil to wick up moisture from below. This helps keep the top layer of soil consistently damp without compacting it.
- Maintain a humid environment. Covering your seed trays with a clear plastic lid or a plastic bag can help trap moisture and create a mini-greenhouse effect. Just be sure to open it for a bit each day to allow for air circulation and prevent mold.
The goal is to keep the soil moist but not waterlogged. Too much water can lead to rot, while too little will prevent the seeds from germinating. It’s a delicate balance, but once you get the hang of it, you’ll see those little sprouts emerge.
It’s important to remember that sycamore seeds need consistent moisture for about 15 days to sprout. After they emerge, they’ll need continued care to develop into healthy seedlings.
For young seedlings, consistent watering is also important as they establish their roots. I find that sycamore trees require consistent, deep watering for their first few years, especially when it’s dry out. Avoid just sprinkling the surface; aim for deeper moisture to encourage strong root growth.
Sunlight and Soil Preferences for Young Sycamore Growth
Once your little sycamore sprouts are ready to move beyond their initial nursery pots, giving them the right environment is key to their healthy development. I’ve found that these trees do best when they have plenty of sunshine. Full sun is ideal for young American sycamores, though they can manage with a bit of partial shade if that’s all you have available. Too much shade, however, and you might notice them getting a bit leggy and weak.
When it comes to soil, sycamores are adaptable, which is a relief. They aren’t overly picky, but they do appreciate good drainage. I mix in some compost or well-rotted manure to my garden soil to give it a good start. This helps prevent water from sitting around the roots, which can cause problems. They can handle a range of soil types, from sandy to clay, as long as water can move through them reasonably well. I’ve had success planting them in areas that might be a bit damp, as they can tolerate wetter conditions better than many other trees, but consistently waterlogged soil is still something to avoid.
Here’s a quick rundown of what I look for:
- Sunlight: Aim for at least 6-8 hours of direct sunlight daily.
- Soil Type: Well-draining loam or sandy loam is best, but they are forgiving.
- pH Level: They are generally tolerant of various pH levels, so don’t stress too much about this.
- Moisture: Keep the soil consistently moist, especially during the first year, but avoid standing water.
It’s important to remember that while mature sycamores are quite drought-tolerant, young seedlings need consistent moisture to establish a strong root system. Think of it like giving a baby bird a steady supply of food – it’s necessary for growth.
When I’m choosing a spot, I also consider the mature size of the tree. Sycamores get big, so giving them ample space from the start means less worry about root issues later on, like pushing up sidewalks. It’s better to plan for that eventual spread. If you’re looking for a tree that can handle a bit of everything, the American Sycamore is a solid choice, especially when you get the planting conditions right. You can find more information on sycamore tree care to help you along the way.
Protecting Seedlings
Once your sycamore seeds have sprouted and you have tiny seedlings, it’s time to think about protecting them. These little guys are vulnerable, so a bit of care goes a long way. I’ve found that a layer of mulch around the base of the seedlings is a good first step. It helps keep the soil moist and also keeps weeds from crowding out your young trees. Just be sure not to pile the mulch right up against the stem, as that can cause rot.
Shade can also be helpful, especially during the hottest part of the day. A simple shade cloth or even a piece of burlap stretched over stakes can make a big difference. It prevents the young leaves from getting scorched.
Now, about pests and diseases. Aphids can sometimes show up, and they’re a real nuisance. I try a blast of water from the hose first. If that doesn’t work, a bit of neem oil does the trick. It’s an organic option that’s effective. Also, keep an eye out for fungal issues like anthracnose or powdery mildew. Good air circulation is key, so don’t plant your seedlings too close together. And try to avoid damaging the bark with things like lawnmowers or string trimmers, because that’s how diseases can get in.
Keeping the area around your seedlings clean is also important. Remove any fallen leaves or debris regularly. This helps prevent pests and diseases from finding a cozy home.
Here’s a quick rundown of what I do:
- Apply a layer of organic mulch around seedlings, keeping it away from the stem.
- Provide temporary shade during peak sun hours with shade cloth or burlap.
- Monitor for aphids and treat with water or neem oil if necessary.
- Ensure good air circulation to prevent fungal diseases.
- Protect the bark from physical damage.
Transplanting or Thinning Sycamore Seedlings
Once your sycamore seedlings have developed a bit, when they’re a few inches tall and have a few sets of leaves, it’s time to think about moving them. This process is called transplanting, and it’s also when you might need to thin them out if you planted too many seeds close together.
The best time to transplant or thin is typically in the spring, after the last frost has passed but before the real heat of summer sets in. This gives the young trees a good chance to establish themselves in their new spot or in larger pots without too much stress.
Here’s how I approach it:
- Assess the Seedlings: Look at your seedlings. Are they getting crowded in their current container? Do they look healthy with good leaf development? If you have way too many in one small tray, you’ll definitely need to thin them.
- Thinning: If seedlings are too close, gently pull out the weaker ones. You want to give the strongest ones enough space to grow. I aim for at least 3-4 inches between seedlings if they’re staying in a tray for a bit longer.
- Transplanting to Pots: When you’re ready to move them to individual pots, choose pots that are a bit larger than what they’re in now. A 4-6-inch pot is a good starting point. Gently loosen the soil around the seedling you want to move, trying to keep as much of the root ball intact as possible. Place it in the new pot, fill with fresh potting mix, and water it in well.
- Transplanting Outdoors: If you’re moving them directly into the ground, wait until they are a year old and have survived at least one winter. Dig a hole that’s twice as wide as the root ball and just as deep. Carefully place the seedling in the hole, backfill with soil, and water thoroughly.
It’s important to handle the roots with care during this whole process. They are quite delicate when the trees are young.
Remember that sycamores can grow quite large, so think about the final spacing needed even when you’re just transplanting them from a seed tray. Giving them enough room from the start will save you a lot of work later on.
Early Care
Once your sycamore seedlings have sprouted and are a few inches tall, it’s time to focus on their early care. This stage is important for setting them up for a healthy life. I’ve found that keeping the soil consistently moist, but not waterlogged, is key. Think of it like a wrung-out sponge – damp, but no puddles.
Watering needs can change depending on the weather, of course. If it’s hot and dry, I might need to water more often. A good way to check is to stick your finger about an inch into the soil. If it feels dry, it’s time to water.
Mulching is another thing I do. I put down a layer of organic mulch, like wood chips or shredded bark, around the base of the seedlings. This helps keep the soil moisture steady and also keeps weeds from taking over. Just make sure not to pile the mulch right up against the stem, as that can cause problems.
As for fertilizer, sycamores aren’t heavy feeders, especially when they’re young. I wait until the second year to start a light feeding schedule. If I do fertilize in the first year, I’ll use a balanced, slow-release fertilizer, applied very sparingly in early spring. It’s easy to overdo it, and that can hurt the young roots. I always follow the package directions carefully, and sometimes even use a bit less than recommended just to be safe.
It’s important to remember that these young trees are still quite delicate. Protecting them from harsh conditions, like strong winds or intense afternoon sun, can make a big difference in their survival and growth rate. Providing a bit of temporary shade if needed can help them establish.
Here’s a quick rundown of what I aim for:
- Watering: Keep soil consistently moist, like a damp sponge. Check soil moisture with your finger before watering.
- Mulching: Apply a 2-3 inch layer of organic mulch around the base, keeping it a few inches away from the stem.
- Fertilizing: Generally, wait until the second year. If fertilizing in the first year, use a balanced, slow-release type very sparingly in early spring.
Common Pests & Diseases Affecting American Sycamore Seedlings
Even though American sycamores are tough trees, young seedlings can still run into some trouble with pests and diseases. It’s not a huge problem, but it’s good to know what to look out for.
One common issue I’ve seen is aphids. These little guys are tiny and can show up in clusters, on new growth. They suck the sap out of the plant, which can weaken it. If you spot them, a good first step is to try a strong spray of water to knock them off. If that doesn’t do the trick, I’ve had success using neem oil, which is a natural insecticide. Just follow the directions on the bottle.
As for diseases, anthracnose and powdery mildew are the main ones to watch out for. Anthracnose can cause leaf spots and twig dieback, especially in wet weather. Powdery mildew looks like a white, dusty coating on the leaves. Both are fungal issues. To help prevent them, I always try to avoid damaging the bark when I’m working around the young trees, like with a weed trimmer. Any damage to the bark can be an open door for these fungi.
It’s also worth noting that if you live in a place that’s both hot and humid, your sycamore seedlings might be more prone to these fungal problems. In those situations, choosing a disease-resistant variety, if you can find one, might be a smart move.
Here’s a quick rundown of what to keep an eye on:
- Aphids: Small, sap-sucking insects that cluster on new growth.
- Anthracnose: A fungal disease causing leaf spots and twig dieback, often worse in wet conditions.
- Powdery Mildew: A fungus that creates a white, dusty coating on leaves.
Taking simple steps like keeping the area around your seedlings clean and avoiding physical damage to the bark can make a big difference in keeping them healthy.
Long-Term Growth
Once your American Sycamore has established itself, managing its long-term growth is mostly about giving it the space it needs and occasional pruning. These trees grow fast and get big, so planning is key. I’ve found that giving them plenty of room from the start pays off later.
Proper spacing is probably the most important thing to consider for mature trees. If they’re too close together, they’ll compete for sunlight and nutrients, and you’ll end up with weaker trees. Plus, their roots can become a problem if they’re too near sidewalks or buildings. I recommend at least 50 feet of clear space around the trunk for a mature tree, though more is always better.
Pruning isn’t a major task for sycamores, but it’s good to do it for a few reasons:
- Remove dead or damaged branches: This helps prevent disease and keeps the tree healthy.
- Improve structure: You can guide the tree’s growth by removing crossing branches or those growing inward.
- Manage size or shape: While sycamores are meant to be large, you can do some light pruning to keep them in check if needed, though I try to avoid major cuts.
When pruning, always use clean, sharp tools. I like to make cuts just outside the branch collar, which is that slightly swollen area where the branch meets the trunk. This helps the tree heal faster.
Sycamores can tolerate wet conditions, which is great, but they also need good air circulation. Overcrowding can lead to fungal issues, so thinning out branches or removing competing trees is a good idea. I learned this the hard way when a few of my younger trees started getting mildew because they were too close together.
Fertilizing isn’t typically necessary for mature sycamores unless the soil is poor. They’re not heavy feeders. If you do decide to fertilize, a balanced, slow-release fertilizer in early spring is sufficient. Just follow the package directions carefully; you don’t want to overdo it. I’ve seen trees get stressed from too much fertilizer, and it’s not pretty. For those looking to grow other hardwoods, understanding the needs of trees like black walnut can be helpful black walnut tree.
Keep an eye out for common issues like anthracnose or powdery mildew, especially in humid weather. Good airflow and avoiding damage to the bark are your best defenses. If you see signs of disease, address it promptly. Sometimes, a simple neem oil spray can do wonders.
Keeping your mature trees healthy and looking great involves knowing the best ways to trim them and give them enough space to grow. Proper care now means stronger, more beautiful trees for years to come. Want to learn more about how to give your trees the best care? Visit our website for expert tips and services.
Frequently Asked Questions
When is the best time to collect American sycamore seed balls?
I typically collect the sycamore seed balls in the fall, right before they start to break apart and release their fuzzy seeds. It’s best to pick them when they’ve turned brown and after the leaves have fallen. Sometimes, I can even find intact seed heads on the ground in late winter or early spring.
How do I extract seeds from the sycamore balls and prepare them?
After collecting the seed balls, I spread them out in a single layer on trays in a well-ventilated area to dry. Once they are dry enough to break apart, I gently crush them and remove the fine hairs attached to the seeds. For larger batches, I wear a mask because the hairs can be a bit irritating to breathe.
What is the best way to store sycamore seeds to keep them viable?
I’ve found that storing sycamore seeds in cold, dry conditions works well for a long time, even up to five years. I keep them in airtight containers with a low moisture content, around 5-10%, and at temperatures between 32 to 45°F.
Do American sycamore seeds need any special treatment before planting, like chilling?
For American sycamore seeds, I haven’t found that they need any special pre-planting treatments like stratification. They sprout just fine when planted under the right conditions. However, some other sycamore types, like the California sycamore, do benefit from a period of moist chilling.
When and how should I plant sycamore seeds?
I prefer to sow sycamore seeds in the spring, mimicking how they naturally start. I plant them about 1/8 inch deep, spacing them roughly six to eight inches apart. It’s important to keep the soil consistently moist but not waterlogged.
How much water do sycamore seeds and seedlings need?
Young sycamore seedlings need consistent moisture to germinate and grow. I make sure the soil stays evenly moist, like a damp sponge, especially during the germination phase. Once they are a bit bigger, I still water them regularly, but mature trees can handle drier spells.
What are the ideal sunlight and soil conditions for growing sycamore trees from seed?
Sycamores thrive in full sun, but they can also manage in partial shade. For the soil, they aren’t too picky; they adapt well to different types and pH levels, as long as the soil drains reasonably well and stays moist.
What are some common issues I might face with sycamore seedlings, and how can I protect them?
To protect young sycamore seedlings, I like to apply a layer of mulch around them to help keep the soil moist and suppress weeds. I also watch out for common pests like aphids, which I might treat with neem oil, and diseases like anthracnose or powdery mildew, often by keeping the area clean and avoiding damage to the bark.